Mozilla Minion
Minion is a security testing framework built by Mozilla to bridge the gap between developers and security testers. To do so, it enables developers to scan with a wide variety of security tools, using a simple HTML-based interface.
It consists of three umbrella projects:
- Minion Frontend, a Python, angular.js, and Bootstrap-based website that provides a HTML interface to authenticate and authorize users, manage sites, initiate scans, and report issues
- Minion Backend, a Python, Flask, and Twisted-based backend that provides an API for the Minion Frontend, and acts as a middleman between the frontend and external security tools
- Minion VM, a repository of recipes to allow quick installations of Minion either via Vagrant or Docker
Minion has limited scanning functionality built into itself. Instead, it relies on the large variety of pre-existing open source and commercial scanning tools. These plugins include:
- Minion ZAP, which utilizes the OWASP Zed Attack Proxy
- Minion Nmap, utilizing the Nmap network scanner
- Minion Skipfish, utilizing the Skipfish reconnaissance tool
- Minion SSLyze, utilizing the SSLyze TLS scanner
- Minion SSL, which uses the sslscan TLS scanner
Installing Minion
Prerequisites
Minion is developed on Ubuntu 14.04. While it should work on other operating systems, your mileage may vary. The installation guide assumes that you will install Minion in /opt/minion, and a virtualenv of /opt/minion/minion-env, with Minion Frontend and Minion Backend installed on different systems.
Install using Minion VM
For developers or testers, we strongly suggest using Minion VM, which will install Minion automatically using either Vagrant or Docker. Of the two, Vagrant is the preferred method, as it helps facilitate rapid development.
Downloading minion-vm
Make sure you have git installed, and then clone the minion-vm repository:
$ git clone https://github.com/mozilla/minion-vm.git
Then, regardless of whether we’re using Vagrant or Docker, it is necessary to edit backend.sh to change the initial administrator’s email address and name:
MINION_ADMINISTRATOR_EMAIL="youremail@yourorganization.org"
MINION_ADMINISTRATOR_NAME="Your Name"
Installation via Vagrant
First, we’ll grab minion-backend, and minion-frontend from GitHub:
$ git clone https://github.com/mozilla/minion-backend
$ git clone https://github.com/mozilla/minion-frontend
Then, edit the BACKEND_SRC and FRONTEND_SRC variables in Vagrantfile to point to the location where you cloned them on your local system. We’ll also create a directory to store the packages that Vagrant VMs will pull down; this will greatly speed up installation. This directory is the APT_CACHE_SRC variable:
BACKEND_SRC = "/home/myuser/minion/minion-backend/"
FRONTEND_SRC = "/home/myuser/minion/minion-frontend/"
APT_CACHE_SRC = "/home/myuser/minion/apt-cache/com.hashicorp.vagrant/apt-cache/"
If you don’t want Minion to use the private network IP addresses 192.168.50.49 and 192.168.50.50 for the backend and frontend respectively, edit them inside both Vagrantfile and vagrant-hosts.sh:
BACKEND_IP = "192.168.50.49"
FRONTEND_IP = "192.168.50.50"

192.168.50.49 minion-backend
192.168.50.50 minion-frontend
Now all we need to do is start it up:
$ vagrant up
That’s it! The Minion frontend should now be accessible at http://192.168.50.50:8080, or whatever you set the IP address to.
You can also ssh into your new Minion instances with vagrant ssh minion-frontend and vagrant ssh minion-backend.
Installation via Docker
The Docker installation will automatically pull down minion-backend and minion-frontend from GitHub.
$ docker build -t 'mozilla/minion-backend'  -f Dockerfile-backend  .
$ docker build -t 'mozilla/minion-frontend' -f Dockerfile-frontend .
$ docker run -d --name 'minion-backend' 'mozilla/minion-backend'
$ docker run -d -p 8080:8080 --name 'minion-frontend' \
    --link minion-backend:minion-backend 'mozilla/minion-frontend'
The Minion frontend should now be accessible over HTTP at the IP address of the system running Docker, on port 8080.
You can also get a shell on your new Minion instances with docker exec -i -t minion-frontend /bin/bash and docker exec -i -t minion-backend /bin/bash.
Manual Installation
Install Minion Backend
We will be installing the Minion Backend into /opt/minion/minion-backend with a virtualenv location of /opt/minion/minion-env.
First install the essentials:
# apt-get update
# apt-get install -y build-essential curl git libcurl4-openssl-dev libffi-dev \
    libssl-dev mongodb-server postfix python python-dev python-virtualenv \
    rabbitmq-server stunnel supervisor
Then, create and source your virtual environment. This will help keep Minion isolated from the rest of your system. We also need to upgrade setuptools from the version included with Ubuntu by default:
# mkdir -p /etc/minion /opt/minion
# cd /opt/minion
# virtualenv minion-env
# source minion-env/bin/activate

(minion-env)# easy_install --upgrade setuptools    # required for Mock
Next, setup your system with the following directories and the minion user account. We’ll also create some convenience shell commands, to make working with Minion easier when running as the minion user:
# useradd -m minion
# install -m 700 -o minion -g minion -d /run/minion -d /var/lib/minion -d /var/log/minion -d ~minion/.python-eggs

# echo -e "\n# Automatically source minion-backend virtualenv" >> ~minion/.profile
# echo -e "source /opt/minion/minion-env/bin/activate" >> ~minion/.profile

# echo -e "\n# Minion convenience commands" >> ~minion/.bashrc
# echo -e "alias miniond=\"supervisord -c /opt/minion/minion-backend/etc/supervisord.conf\"" >> ~minion/.bashrc
# echo -e "alias minionctl=\"supervisorctl -c /opt/minion/minion-backend/etc/supervisord.conf\"" >> ~minion/.bashrc
Now we can checkout Minion and install it:
# cd /opt/minion
# git clone https://github.com/mozilla/minion-backend.git
# source minion-env/bin/activate
(minion-env)# cd minion-backend
(minion-env)# python setup.py develop
To make sure that Minion starts when the system reboots, we need to install the Minion init script. We can also disable the global supervisord installed with apt-get install above, if it wasn’t being used before:
# cp /opt/minion/minion-backend/scripts/minion-init /etc/init.d/minion
# chown root:root /etc/init.d/minion
# chmod 755 /etc/init.d/minion
# update-rc.d minion defaults 40
# update-rc.d -f supervisor remove
Next, we enable debug logging and automatic reloading of Minion or plugins upon code changes, by adding the --debug and --reload options:
# sed -i 's/runserver/--debug --reload runserver/' /opt/minion/minion-backend/etc/minion-backend.supervisor.conf
Note
Auto-debugging and auto-reloading shouldn’t be enabled on production systems, for security purposes.
And that’s it! Provided that everything installed successfully, we can start everything up:
# service mongodb start
# service rabbitmq-server start
# service minion start
From this point on, you should be able to control the Minion processes either as root or as the newly-created minion user. Let’s become the minion user, and see if everything is running properly:
# su - minion
(minion-env)$ service minion status
minion-backend                   RUNNING    pid 18010, uptime 0:00:04
minion-plugin-worker             RUNNING    pid 18004, uptime 0:00:04
minion-scan-worker               RUNNING    pid 18009, uptime 0:00:04
minion-scanschedule-worker       RUNNING    pid 18008, uptime 0:00:04
minion-scanscheduler             RUNNING    pid 18007, uptime 0:00:04
minion-state-worker              RUNNING    pid 18005, uptime 0:00:04
Success! You can also use minionctl (an alias to supervisorctl, using the Minion supervisord.conf configuration) to stop and start individual services, or check on status:
(minion-env)$ minionctl stop minion-backend
minion-backend: stopped

(minion-env)$ minionctl status minion-backend
minion-backend                   STOPPED    Sep 03 09:18 PM

(minion-env)$ minionctl start minion-backend
minion-backend: started

(minion-env)$ minionctl status minion-backend
minion-backend                   RUNNING    pid 18795, uptime 0:00:07
All that’s left to do now is initialize the Minion database and create an administrator:
(minion-env)$ minion-db-init 'Your Name' 'youremail@mozilla.com' y
success: added 'Your Name' (youremail@yourcompany.com) as administrator
And we’re done! All logs for Minion, including stdout, stderr, and debug logs, should appear in /var/log/minion.
Note
If you use virtualenv (recommended), then the Minion convenience scripts (such as minion-db-init) are only available if the shell is sourced into the virtualenv. This is done automatically for the Minion user. In other words, if you open a new terminal and then try minion- with auto-completion, the chance is you won’t see anything. If you install Minion without virtualenv, these scripts will be available to the $PATH.
Install Minion Frontend
First, install the essentials:
# apt-get update
# apt-get install -y build-essential git libldap2-dev libsasl2-dev \
    libssl-dev python python-dev python-virtualenv supervisor
Then, create and source your virtual environment. This will help keep Minion isolated from the rest of your system. We also need to upgrade setuptools from the version included with Ubuntu by default:
# mkdir -p /etc/minion /opt/minion
# cd /opt/minion
# virtualenv minion-env
# source minion-env/bin/activate
(minion-env)# easy_install –upgrade setuptools # required for Mock
Next, setup your system with the following directories and the minion user account. We’ll also create some convenience shell commands, to make working with Minion easier when running as the minion user:
# useradd -m minion
# install -m 700 -o minion -g minion -d /run/minion -d /var/lib/minion -d /var/log/minion -d ~minion/.python-eggs

# echo -e "\n# Automatically source minion-frontend virtualenv" >> ~minion/.profile
# echo -e "source /opt/minion/minion-env/bin/activate" >> ~minion/.profile

# echo -e "\n# Minion convenience commands" >> ~minion/.bashrc
# echo -e "alias miniond=\"supervisord -c /opt/minion/minion-frontend/etc/supervisord.conf\"" >> ~minion/.bashrc
# echo -e "alias minionctl=\"supervisorctl -c /opt/minion/minion-frontend/etc/supervisord.conf\"" >> ~minion/.bashrc
Now we can checkout Minion and install it:
# cd /opt/minion
# git clone https://github.com/mozilla/minion-frontend.git
# source minion-env/bin/activate
(minion-env)# python setup.py develop
To make sure that Minion starts when the system reboots, we need to install the Minion init script. We can also disable the global supervisord installed with apt-get install above, if it wasn’t being used before:
# cp /opt/minion/minion-frontend/scripts/minion-init /etc/init.d/minion
# chown root:root /etc/init.d/minion
# chmod 755 /etc/init.d/minion
# update-rc.d minion defaults 40
# update-rc.d -f supervisor remove
And that’s it! Provided that everything installed successfully, we can start everything up:
# service minion start
From this point on, you should be able to control the Minion processes either as root or as the newly-created minion user. Let’s su - minion, and see if everything is running properly:
# su - minion
(minion-env)minion@minion-frontend:~$ service minion status
minion-frontend                  RUNNING    pid 1506, uptime 1 day, 1:25:41
Success! You can also use minionctl (an alias to supervisorctl, using the Minion supervisord.conf configuration) to stop and start individual services, or check on status:
(minion-env)minion@minion-frontend:~$ minionctl stop minion-frontend
minion-frontend: stopped
(minion-env)minion@minion-frontend:~$ minionctl status minion-frontend
minion-frontend                  STOPPED    Sep 09 07:15 PM
(minion-env)minion@minion-frontend:~$ minionctl start minion-frontend
minion-frontend: started
(minion-env)minion@minion-frontend:~$ minionctl status minion-frontend
minion-frontend                  RUNNING    pid 8713, uptime 0:00:05
Configuring Minion
This document explains how to configure the Minion frontend and backend.
As a convention, Minion will look in /etc/minion/ and ~minion/.minion for its configuration files.
Configure Minion Frontend
Here is the default configuration for the Minion frontend server:
{
    "backend-api": {
        "url": "http://minion-backend:8383"
    },

    "login": {
        "type": "persona",

        "ldap": {
            "uri": "ldaps://ldap.server/",
            "baseDN": "ou=test,dc=test_dc",

            "emailAttribute": "mail",
            "groupMembershipAttribute": "member",
            "usernameAttribute": "uid",

            "checkAuthorizedGroups": false,
            "authorizedGroups": [
                "ou=groupTest1,ou=test,dc=test_dc",
                "ou=groupTest2,ou=test,dc=test_dc"
            ]
        },

        "oauth": {
            "providers": {
                "facebook": {
                    "client_id": "",
                    "client_secret": ""
                 },
                "firefoxaccounts": {
                    "client_id": "",
                    "client_secret": ""
                },
                "github": {
                    "client_id": "",
                    "client_secret": ""
                },
                "google": {
                    "client_id": "",
                    "client_secret": ""
                }
            }
        }
    }
}
To configure the frontend, place your configuration in a file called frontend.json in either /etc/minion or /home/user/.minion.
backend-apiuri: URI of the Minion backend server
logintype: the type of authentication to use; currently supported types arepersona, which requires no configuration,ldap, andoauthldap: the configuration for LDAP, ifldapis the chosen authentication method inlogin -> typeuri: URI to ldap serverbaseDN: baseDN for users; not needed for Active DirectoryemailAttribute: typicallymailin OpenLDAP oruserPrincipalNamein Active DirectorygroupMembershipAttribute: typicallymemberin OpenLDAP oruniqueMemberin Active DirectoryusernameAttribute: typicallyuidin OpenLDAP orsamAccountNamein ADcheckAuthorizedGroups: if true, require group membership in addition to valid user idauthorizedGroups: list of groups where users are authorized to use Minion (ifcheckAuthorizedGroupsis true)
oauth: the configuration for OAuth, ifoauth` is the chosen authentication method is set in ``login -> type; see Configuring OAuth***: supported providers are Facebook, Firefox Accounts, GitHub, and Googleclient_id: client_id for the chosen providerclient_secret: client_secret for the chosen provider
Configure Minion Backend
Here is the default configuration for the Minion backend server:
{
    'api': {
        'url': 'http://127.0.0.1:8383',
    },
    'celery': {
        'broker': 'amqp://guest@127.0.0.1:5672//',
        'backend': 'amqp'
    },
    'mongodb': {
        'host': '127.0.0.1',
        'port': 27017
    },
    'email': {
        'host': '127.0.0.1',
        'port': 25,
        'max_time_allowed': 604800 # 7 * 24 * 60 * 60 (7 days)
    }
}
To configure the backend, place your configuration in a file called backend.json at either /etc/minion or
/home/user/.minion.
apiurl: the full authority (hostname and port) of the backend server.
celerybroker: URI of the celery brokerbackend: protocol used to speak to backend
mongodb:host: hostname of MongoDB serverport: port of the MongoDB server
emailhost: hostname of mail serverport: port of mail servermax_time_allowed: determines the life time of an invitation; by default it will remain valid for seven days.
Configuring OAuth
Minion currently supports Facebook, Firefox Accounts (FxA), GitHub, and Google Accounts as OAuth providers.

To enable a provider, simply input the client_id and client_secret provided by them into frontend.json. Once input, they should automatically appear as options on the login page. For example:
"facebook": {
     "client_id": "1234567890101112",
     "client_secret": "1c414b10981bfe1aa134874ac4daf780"
 }
When configuring the provider, each will have a unique callback URI corresponding to its provider name. The URI should look like:
<http or https>://<hostname>/ws/login/oauth/<provider>
For example:
https://minion.mozilla.org/ws/login/oauth/facebook
Whitelisting and Blacklisting Hosts
By default, Minion will blacklist the following IP addresses from being scanned:
"blacklist": [
    "10.0.0.0/8",
    "127.0.0.0/8",
    "172.16.0.0/12",
    "192.168.0.0/16",
    "169.254.0.0/16"
]
You can check the latest list at: .
The effect of this is that Minion will refuse to scan any target site whose hostname falls in one of the ranges.
For example, when Minion resolve the hostname localhost to 127.0.0.1, Minion will abort the scan because
it is blacklisted.
To configure the blacklist and whitelist, you can copy etc/scan.json into either /etc/minion/ or ~minion/.minion/. Note that the whitelist will override the blacklist, so in this example, IP addresses in 192.168.1.0/24 can be scanned, despite 192.168.0.0/16 being in the blacklist:
{
    "whitelist": [
        "192.168.1.0/24"
    ],
    "blacklist": [
        "10.0.0.0/8",
        "127.0.0.0/8",
        "172.16.0.0/12",
        "192.168.0.0/16",
        "169.254.0.0/16"
    ]
}
Any host that does not fall within the blacklist can be scanned.
IP address blacklisting and whitelist also supports hostnames and hostname wildcards. For example:
"blacklist": [
    "mozilla.com",
    "*.mozilla.org"
]
In this configuration, we allowed scanning LAN network and localhost, but we removed the ability to scan mozilla.com and any subdomain of mozilla.org. Note that if we wanted to block mozilla.org and subdomains, we would need entries for mozilla.org and *.mozilla.org:
"blacklist": [
    "mozilla.org",
    "*.mozilla.org"
]
Installing Plugins
Plugins are essential to Minion scan. Every attack plan will specify one or more Minion plugin. A plugin is essentially a Python wrapper around a scan tool. The tool can be as complex as OWASP ZAP or as simple as checking HTTP header using Python (such as basic.plan that is shipped with Minion).
To view a list of plugins available to Minion backend, logged in the frontend with an admin account, click on Administration, and then click on Plugins.

The Minion instance this screenshot is taken from has custom plugin Nmap. Plugins that are under
the namespace minion.plugins.basic.* come from the basic plugin that is shipped with Minion backend.
In this document, users can learn how to install the Nmap plugin. Each plugin should have roughly similar instructions for installation.
First, we need to install whatever external tool the plugin requires, in this case, nmap:
# apt-get update && apt-get -y install nmap
Then, source the Minion virtualenv, download the plugin, and install it:
# source /opt/minion/minion-env/bin/activate
(minion-env)# cd /opt/minion
(minion-env)# git clone https://github.com/mozilla/minion-nmap-plugin.git
(minion-env)# cd minion-nmap-plugin
(minion-env)# python setup.py install
Finally, restart Minion to pick up the new plugin:
# /etc/init.d/minion stop
# /etc/init.d/minion start
This should add the Minion plugin to the plugin administration page. Simply configure its plan, assign it to a site, and you’re ready to begin scanning!
Using Minion
Minion’s frontend is separate from the backend repository. Here we show how the frontend looks.
Login
Minion’s frontend is authenticated using Persona. You can replace Persona if you want. The backend is authentication agonistic; it is the job of the frontend web service to verify that given user has permission to access a resource. We explain this in Inside Minion.

If you are new to Persona, please check Sign up for a Persona account to find out how to make your email address into a Persona-capable email address.
Dashboard
The screenshot belows is the first thing a Minion user will see after logging in. The current logged in user can only see the sites that he or she has access to; the user must be in a group that the site is also in. We will explain this later in the admin section.

The dashboard shows the progress of the newest scan (if any), the number of issues discovered by the newest scan, a link to view the detail of the newest scan and a button to trigger a scan.
The Scan History tab shows all the scans performed on the site. The All Issues tab lists issues of the newest scan for each site the user has access to.
If the user is in multiple groups, the dashboard also provide a drop-down menu on the upper mid-right corner to switch the group view, as shown in the screenshot below. In this case this current logged in user belongs to two groups.

Scan Detail
The scan detail page lists all the issues with a short title. If the scan failed it will list the reason.

Issue Detail
Every issue has a detail page that describes the problem, possible mitigation and a list of references to look up.

Admin: Users
This panel lists all the users in Minion. As with all other panels in the rest of the administration dashboard, there is a filter and an in-page search box to find users.

Admin: Sites
This panel lists all the sites that have been added to this Minion instance. Currently only admin users can
add sites and site url format is also restricted. As of 0.4 release, Minion can only accept url that looks like
http[s]://<subdomain>*.<domain>. For example, while 192.168.1.100, foobar.com and foo.bar.com
are valid, the frontend will not accept paths so that foobar.com/project/ is not acceptable.
There is a longstanding ticket to loosen up this restriction in the future release of Minion.
Note
Also, since 0.4 release there is a hostname blacklist and whitelist mechanism added to Minion. Hostnames like 127.0.0.1 are blocked by Minion by default. To whitelist and/or blacklist what hostnames can be scanned, please refer to Whitelisting and Blacklisting Hosts.

Every site can have one or more attack plan. An attack plan is a JSON configuration which specifies the type of plugin the attack will use. Every site belongs to zero or more groups and only the users in those groups can scan the site. As of 0.4 release, you must add the site first and then add the site and user to a group in the Group tab.
Admin: Groups
As aforementioned in the previous section, once a site has been added, it should be added to a group by going to the Groups panel. Every group contains a set of users and a set of sites; only these users can access these sites. Bob’s personal blog can belong to two groups named Group A and Group B. As long as Alice is in one of these two groups, she can too scan Bob’s personal blog on Minion.

By pressing the Edit button, the user is redirected to an editor page.

Admin: Plugins
A Minion plugin is basically a Python class that invoke a security scan tool. This scan tool can be as simple as a few lines of Python code directly in the class or invoking an external exectuable binary (which can be a simple bash script or as complex as OWASP ZAP).
Minion’s backend actually ships with some simple Python plugins called basic plugin. In the screenshot above, they are under the namespace minion.plugins.basic. These plugins check HTTP header and robots.txt. Other plugins are not distributed with the backend. You must install them indivdually (although the backend repository has the sample configuration file for zap, skipfish and nmap).
To learn more about how to install plugins, please check Installing Plugins. For plugin development, please refer to Developing Plugins.
Admin: Plans
Plans are basically JSON blob/document that specifies what plugins to use (and their configurations). You can have a plan that utilizes the basic plugin and ZAP plugin.

Admin: Invites
If you want to invite another person to use your Minion, you can send them an invitation. You can add, resend, or cancel invitation. You can also check whether the invitation is accepted, declined or expired.
When a user is invited, the account is created, but the account is suspended until the user has accepted the invitation and is authenticated by logging in using a Persona address. If your friend has two email addresses and you invite your friend by using the non-Persona email address, your friend can accept the invitation and log in using his or her Persona email address. Minion will take care of the transition (replacing non-Persona email address in the database which his or her Persona account).
Inside Minion
In this document, we will look at the internals of Minion. Many of the points below have been discussed previously at:
While the blog posts may be outdated, they are useful to look at.
Minion’s mission
Minion is developed as an open source project by the Mozilla Security Assurance team. The goal is to enable developers and security testers to bring web application security into a continuous testing cycle. To do this, both developers and testers are given an easy to use dashboard that lists all the sites they need to scan, detail scan summary page and detail issue page to explain vulnerability. Instead of learning a new scan tool, users can write Minion plugins to call their favorite scan tools, and Minion will spawn the tool as a new process, scan the target website, and return the results back to the user.
Architecture
At a high level there are three major components in Minion: Plugins, Task Engine, and Front End.
In principle, the backend of Minion consists of a task engine and a set of plugins. The Front End exposes a user interface for both regular users and administrators to manage configurations and to see scan results.
Technology stack
Before we divde into what each component does, let us look at the technology stack we are using in Minion:
- We build the backend and frontend heavily in Python, using the Flask web framework for building an APIs server.
- The backend’s task engine uses Twisted for plugin execution.
- We use RabbitMQ to queue and transfer messages between executing plugin and the backend’s task engine.
- The Front-end has a layer of wrapper APIs serving with Flask web framework.
- We create the front end interface using angular.js and Twitter Bootstrap by making http requests to our front end’s APIs (which in turns make requests to the backend’s API server).
- We use MongoDB as our data store.
- By default, our version of Minion is using Persona for authentication.
This stack corresponds to the diagram shown below.
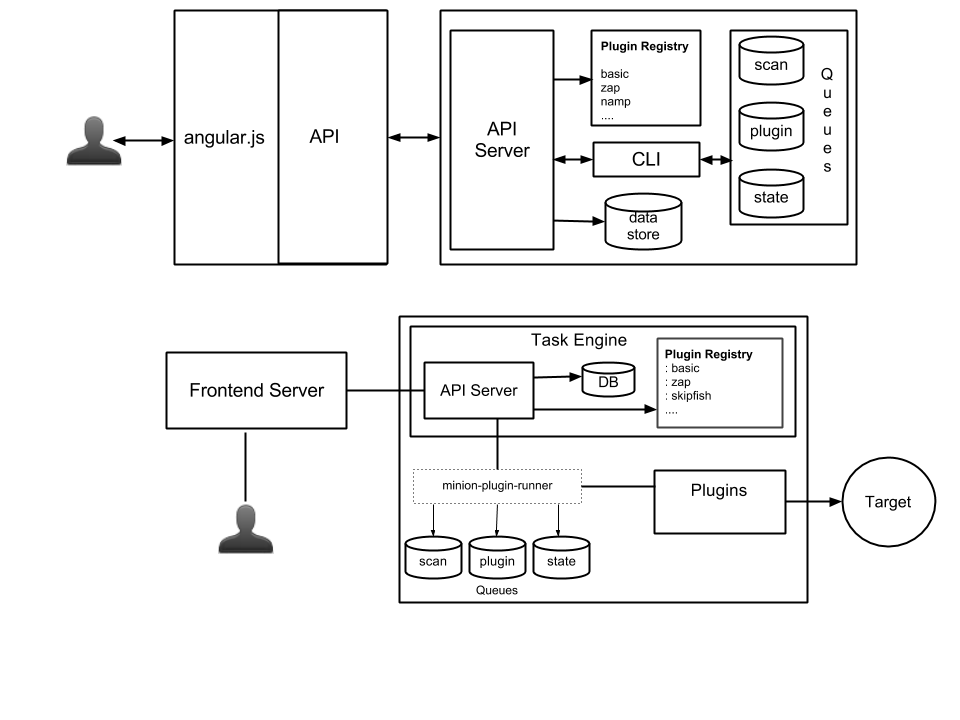
Plugins
Minion plugins are light-weight wrappers that perform tasks such as configuring, starting, stopping a plan, and accept a set of callbacks to notify the caller that information is available. Minion ships with several primitive plugins known as basic plugin. This group of plugins checks to see whether the target URL is accessible, examines various HTTP headers and verifies whether robots.txt exists and correct.
Two base classes for plugins are provided in the Minion backend to get developers started:
- BlockingPlugin provides the basic functionality to support a plugin that performs a task, and reports it’s completion state at the end. This is suitable for creating straightforward plugins directly within Python.
- ExternalProcessPlugin provides the functionality required to kick-off an external tool, and the class provides the basis for several other extensions, especially those that wrap existing security tools.
Besides the primitive basic plugins, Mozilla developers have created several plugins:
- Minion ZAP, which utilizes the OWASP Zed Attack Proxy
- Minion Nmap, utilizing the Nmap network scanner
- Minion Skipfish, utilizing the Skipfish reconnaissance tool
- Minion SSLyze, utilizing the SSLyze TLS scanner
- Minion SSL, which uses the sslscan TLS scanner
Task Engine
Minion Backend and Minion Task Engine are synonym in this docuemtnation. The Task Engine provides the core functionality for managing users, groups, sites, scans, and results within the Minion platform. Acting as a central hub, the Task Engine maintains a register of available plugins, provides facilities for creating and modifying plans, and managing user access to Minion, including which sites they can scan.
To execute a scan on a target URL, one or more plan must be defined for the target URL and a scan is initiated by picking a specific plan. In the nutshell, a plan is a JSON document that specifies some information about what the plan does, and a sequence of plugins to invoke (and such sequence is called a workflow). An example is shown below:
{
 "name": "Fuzz and Scan",
 "description": "Run Skipfish to fuzz the application, and perform a ZAP scan.",
 "workflow": [
      {
           "plugin_name": "minion.plugins.skipfish.skipfish.SkipfishPlugin",
           "description": "",
           "configuration": {}
      },
      {
           "plugin_name": "minion.plugins.zap.zap_plugin.ZAPPlugin",
           "description": "Run the ZAP Spider and Scanner",
           "configuration": {
                "scan": true
           }
      }
 ]
This plan will invoke Skipfish and ZAP. The configuration for Skipfish plugin is left empty to use the default options. Some plugins have required and optional configuration parameters for users to specify.
Front End
As we stated in the technology stack section, the front end server is a Flask web application, while the user interface is created using AngularJS. In simple terms, users do not make direct API calls to the backend. In the nutshell, the task engine has very very little access control built-in. The front end is responsible for creating the ACL by wrapping API requests to the task engine in the front end’s API. AngularJS makes calls to the front end’s API endpoints.
This looks confusing and unncessary for newcomer, but the main advantage is that we can re-engineer the front end in anyway we want with little to zero impact to the task engine. For example, someone swap out the entire front end and our Persona authentiation with their own front end implementation and authentication model (e.g. LDAP authentication).
Developing Plugins
Minion plugins are Python classes that talks to a security aessement tool. This tool can be pure Python code inside the class doing HTTP header check (which is what the basic plugins do), or invoke an external executable binary. It can be as simple as a few lines of Perl or as complex as OWASP ZAP.
How Minion discovers new plugins
If we look at minion-zap-plugin’s source code structure closely, we notice the layout of the package looks minimally like this:
$ tree minion-zap-plugin

minion-zap-plugin
├── minion
│   ├── __init__.py
│   └── plugins
│       ├── __init__.py
│       └── zap
│           ├── __init__.py
│           ├── reference.py
│           └── zap_plugin.py
└── setup.py
Every plugin must fall under the minion.plugins package namespace.
This is how the backend detects an existence of a plugin. The third level
in minion-zap-plugin is a directory called zap. This is the namespace
of the plugin itself. In addition, the plugin class must be a subclass of
AbstractPlugin and the following class member attributes:
PLUGIN_NAME: the name of the plugin displayed to the frontend userPLUGIN_VERSION: the release version of the pluginPLUGIN_WEIGHT: level of resource required to launch this plugin (light, medium, heavy)
The registry code is found in base.py.
Whenever a plugin is installed, the backend server and all the celery workers must be restarted, unless the backend is run with the –reload option.
Minion Plugin Classes
Now that you know how Minion discovers a new plugin, we can examine plugin classes.
The first thing a plugin author needs to understand is the basics of Twisted. Minion’s Task Engine uses Twisted for running plugins. We recommend plugin authors go over An Introduction to Asynchronous Programming and Twisted before jumping into writing plugin. We will only cover relevant information to get you understand how a Minion plugin works.
AbstractPlugin class
The AbstractPlugin class implements a set of methods and attributes that
a plugin should define. It also provides additional methods
that need not be override by plugin authors. The AbstractPlugin should be
the base class for any plugin you want to write. Minion ships with two
classes of plugins (BlockingPlugin and
ExternalProcessPlugin) inherit from AbstractPlugin and other plugins
Minion developers have developed so far are inheriting from one of the two
classes. We will get into them in the later section; let’s focus on
AbstractPlugin.
Remember how Minion discovers and registers new plugin? The registry
code expects the plugin to be found in the minion.plugins namespace,
and in addition the plugins must have three class methods defined:
name, version, and weight.
The AbstractPlugin implements these class methods with a default value.
For example, if you don’t define name, it will use the plugin’s class name
as the name of the plugin. But it is always a good idea to define them
yourself.
To actual do work, a plugin should implement do_configure, do_start
and do_stop methods since the AbstractPlugin leaves them blank.
BlockingPlugin class
This class inherits from AbstractPlugin directly and is defined in
base.py
like AbstractPlugin.
The BlockingPlugin implements do_configure, do_start, and do_stop
methods. Most of the Twsited logics are defined in the do_start method. The
class simply expects a method called do_run and passes this method to the
deferToThread which will return an asynchronous result that will return
an actual result some time in the future. The nice deferToThread API
has a pair of callbacks: success and failure. We simply add these two
callbacks to the defer result object and returns.
The magic of Twsited is the event-driven model, also known as reactor model. The idea is that an event loop will react to an event, possibly executes the event, and then emits a callback when the event is finished.
You are probably wondering what happen to do_configure. This particular
class of plugin does not expect any pre-processing configuration needed. As
we study the source code, we will see that all basic plugins are instances of
BlockingPlugin. After all, they just need to connect to the target URL,
examine a header or validate the robots.txt.
ExternalProcessPlugin class
This is another implementation of AbstractPlugin class and this class
is useful for executing a plugin that relies on external process such as
ZAP or Skipfish. Instead of calling subprocess, we use Twsited’s
reactor.spawnProcess to launch the external process.
Keen readers notice do_configure is also not defined. This is intentional.
Every plugin that inherits from the ExternalProcessPlugin will implement
its own do_configure because different process is launched differently.
Import plugin class in __init__.py
When we revisit the structure of a plugin package, it looks like this:
minion-zap-plugin
├── minion
│   ├── __init__.py
│   └── plugins
│       ├── __init__.py
│       └── zap
│           ├── __init__.py
│           ├── reference.py
│           └── zap_plugin.py
└── setup.py
The third __init__.py should import the main plugin class. In the case of the zap plugin, it looks like this:
from zap_plugin import ZAPPlugin
If the file is left blank, Minion’s plugin discovery code will not be able to import ZAPPlugin.
Plugin Template Generator
Because developing a plugin with the right structure can be tedious and error-prone, there is a script to generate Minion plugin. The script lives here: https://gist.github.com/yeukhon/8309083
To use this script, download generate-plugin.py and config.ini. Then edit config.ini to fit your need (see sample-config.ini on the same page as an example).
Contribute
Minion is built using open source projects such as Python, angular.js, Flask, Celery, and Twisted. In order to make Minion feature richer and secure, we invite the community to contribute in any way they can. If you have ideas to submit, or have issues to report, you encourage to contact us via:
IRC: #websectools channel on irc.mozilla.org
Email list: http://groups.google.com/group/mozilla-minion-dev
Any of our GitHub repos:
- Minion Frontend, a Python, angular.js, and Bootstrap-based website that provides a HTML interface to authenticate and authorize users, manage sites, initiate scans, and report issues
- Minion Backend, a Python, Flask, and Twisted-based backend that provides an API for the Minion Frontend, and acts as a middleman between the frontend and external security tools
- Minion VM, a repository of recipes to allow quick installations of Minion either via Vagrant or Docker
- Minion ZAP, which utilizes the OWASP Zed Attack Proxy
- Minion Nmap, utilizing the Nmap network scanner
- Minion Skipfish, utilizing the Skipfish reconnaissance tool
- Minion SSLyze, utilizing the SSLyze TLS scanner
- Minion SSL, which uses the sslscan TLS scanner
Developers
We are available in the #websectools channel on irc.mozilla.org:
- April King (April)
- Mark Goodwin (mgoodwin)
- Simon Bennetts (psiinon)
- Yvan Boily (yvan)